Create a Bootable Windows 11 USB Drive

If you want to create a bootable Windows 11 USB drive to install or reinstall the operating system on your PC, this guide covers the most reliable methods: Microsoft’s official tool, Rufus, Ventoy, and even the command line. You will find step-by-step instructions, the right settings (UEFI, Secure Boot, partition scheme), and solutions to the most common problems.
Basic requirements
- An 8–16 GB USB drive (16 GB or more is recommended). It will be formatted, so back up its contents first.
- A Windows PC to create the installation media.
- A stable Internet connection (if you use Microsoft’s tool or download the ISO).
- Optional: a product key (you can activate Windows after installation).
- The target PC should preferably have UEFI enabled (and Secure Boot, if required).
Method 1 (recommended): Microsoft Media Creation Tool
This is the easiest official way to create a bootable Windows 11 USB drive.
- Go to the Windows 11 download page and download the Media Creation Tool.
- Run it as an administrator and accept the terms.
- Choose the language and edition, or keep the recommended options.
- Select “USB flash drive” as the destination.
- Select your USB drive from the list. The tool downloads the ISO and prepares it automatically.
- When it is finished, you will have a UEFI-bootable installation drive ready to use.
Pros: no complicated configuration, up-to-date installation media, and high compatibility.
Cons: requires a full download and formats the USB drive.

Method 2 (flexible): Rufus + Windows 11 ISO
With Rufus, you can customize the partition scheme and file system. It is ideal if you need to create a bootable Windows 11 USB drive for different PCs.
- Download the official Windows 11 ISO from Microsoft’s “Download Windows 11 Disk Image” section.
- Download the portable version of Rufus and run it.
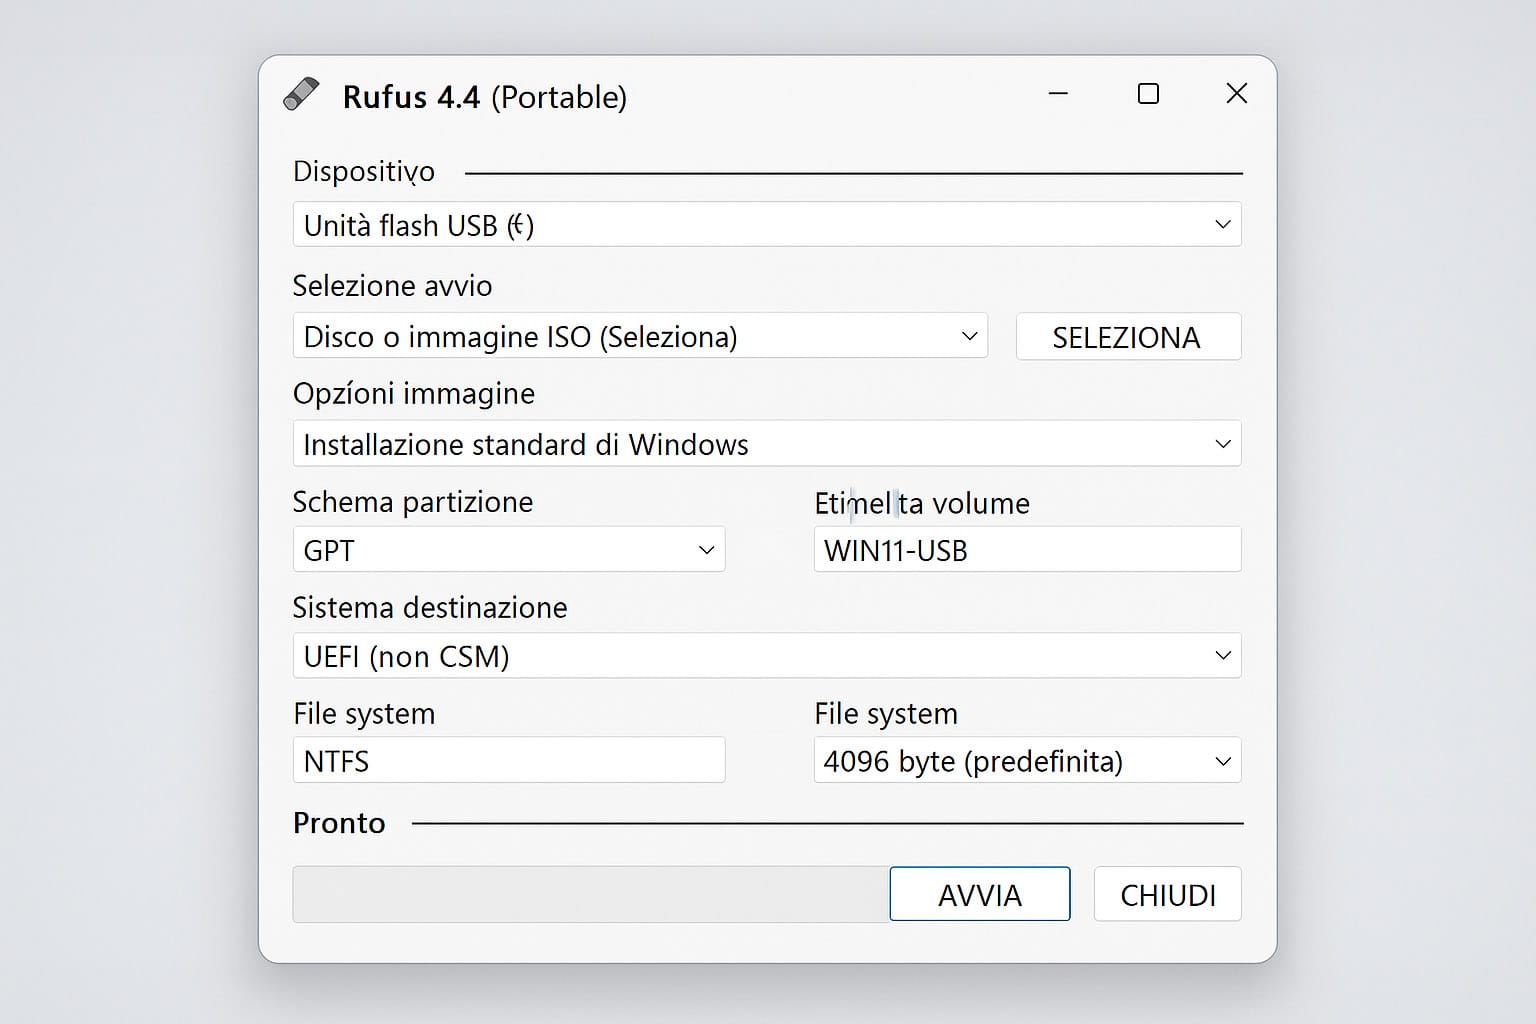
- Insert the USB drive and set the following options:
- Device: your USB drive.
- Boot selection: Disk or ISO image → Select → Windows 11 ISO.
- Partition scheme: GPT for UEFI PCs (recommended); MBR for BIOS/Legacy systems.
- Target system: UEFI (non CSM) when using GPT.
- File system: NTFS to avoid issues with files larger than 4 GB; FAT32 for maximum compatibility.
- Click Start. If prompted, use the extra options to bypass requirements only if necessary.
- Wait for the files to be copied and for the boot settings to be configured.
Pros: full control over the partition scheme and file system; very fast.
Cons: one additional step; you need to obtain the ISO separately.
Method 3 (multi-ISO and maintenance): Ventoy
Ventoy lets you prepare the USB drive once and then copy ISO files to it like regular files. At boot, you choose the ISO from a menu. It is ideal if you want to create a bootable Windows 11 USB drive and reuse it with other ISOs, such as Windows 10, Linux, or utilities.
- Download Ventoy and run it as an administrator.
- Select the USB drive → Install (this formats it and writes the bootloader).
- Copy the Windows 11 ISO to the USB drive.
- Boot the PC from the USB drive and select the ISO from the Ventoy menu.
Pros: one USB drive for multiple ISOs; updating is easy, as you only need to replace the files.
Cons: it may have limitations on very old hardware; you still need the ISO.

Method 4 (advanced): Command line with Diskpart
For experienced users, you can create a bootable Windows 11 USB drive directly from the Command Prompt using Diskpart.
⚠️ Warning: selecting the wrong disk will erase data. Double-check the disk number.
1. Open Command Prompt as an administrator:
diskpart
list disk
select disk X        (sostituisci X con il numero della USB)
clean
convert gpt
create partition primary
format fs=fat32 quick
assign letter=U
exit
2. Mount the ISO by double-clicking it in Windows 10 or Windows 11.
3. Copy all files from the ISO to the USB drive (U:). If a file is larger than 4 GB:
- use NTFS instead of FAT32; or
- manage UEFI with NTFS through dedicated drivers (Rufus does this automatically); or
- split the file, which is more cumbersome.
Pros: no third-party software required.
Cons: more room for error and manual file system/UEFI management.
Booting the PC from the USB drive
After you have finished creating your bootable Windows 11 USB drive, follow these steps to start the installation:
- Insert the USB drive into the powered-off PC.
- Turn it on and press the Boot Menu key, typically F12, F11, Esc, or F8. Alternatively, enter the BIOS/UEFI with Del or F2.
- Select the USB drive and start the Windows 11 setup wizard.
UEFI settings to check
- UEFI vs. Legacy (CSM): keep UEFI enabled for Windows 11.
- Secure Boot: normally set to ON. If you use NTFS or particular solutions, you may need to disable it temporarily.
- Fast Boot: may prevent USB devices from being detected at startup; disable it if you have problems.
- Boot order: place the USB drive first, or use the one-time Boot Menu.
Troubleshooting common issues
The USB drive does not appear in the Boot Menu
- Try a different USB port; on older PCs, use a USB-A 2.0 port.
- Recreate the drive using GPT/UEFI or MBR/Legacy, according to the PC firmware.
- Disable Fast Boot in UEFI.
Error while creating the drive with Media Creation Tool
- Check the available disk space and the stability of your Internet connection.
- Run the tool as an administrator.
Installation freezes or files are missing
- The ISO may be corrupted: download it again from the official website.
- Try another USB drive: some older USB drives can cause write errors.
TPM/Secure Boot requirements
- On borderline hardware, Rufus may offer options to bypass the checks. Consider the pros and cons, including security and updates.
- Update the BIOS/UEFI, and enable TPM and Secure Boot if available.
Best practices and security
- Download only from official sources, such as Microsoft, to avoid tampered ISOs.
- Safely eject the USB drive after creation to prevent corruption.
- Label the drive, for example, “Win11-GPT-UEFI,” so you can identify it quickly.
- Before formatting a PC, back up your data and, if possible, create a system image.
- If you manage multiple systems, consider a multi-ISO Ventoy solution.
FAQ
Can I use the same USB drive for multiple PCs?
Yes, as long as you do not reformat it. It is practical to dedicate one USB drive to Windows 11 installation media and keep it up to date.
FAT32 or NTFS?
FAT32 provides broad UEFI compatibility but has a 4 GB file-size limit. NTFS avoids that limit but can sometimes require additional measures, such as the UEFI-NTFS drivers managed by Rufus.
How long does it take?
With the Media Creation Tool, it depends on your Internet connection, often around 15–30 minutes. With Rufus, once you have the ISO, writing the drive is fast.
Conclusion
In short, the simplest way to create a bootable Windows 11 USB drive is the Media Creation Tool: it is official, up to date, and reduces the risk of errors. If you need control over the partition scheme or must adapt to older firmware, Rufus is the most flexible option. For anyone managing multiple ISOs, Ventoy simplifies everything with a dedicated boot menu. By following these steps, you can complete the process smoothly.
Share this post
About the Author: Enrico